邮件群发-邮件群发软件|邮件批量发送工具|群发邮件平台|批量邮箱发送系统公司
将Transforming a WordPress Server Dashboard into a Widget


回想一下,所有小部件提供程序都必须实现 Provider 接口。它们还必须位于名为 widget 的文件夹内,并位于名称空间 AX\StatBoard\Widget 下。如果我们想添加一种新的指标,只需创建一个相应的类,并创建一个对象并使用 add_provider 方法将其添加到 Widget 类中。
RAM 使用情况小部件
我们想要显示的第一条信息是当前正在使用的 RAM 量以及当前空闲的 RAM 量。
在本例中,free -m 是我们的朋友 - 它告诉我们 RAM 使用情况。 -m 开关是以兆字节为单位输出结果。
[vagrant@vagrant-centos64 ~]$ free -m
             total       used       free     shared    buffers     cached
Mem:           589        366        223          0          9         57
-/+ buffers/cache:        299        290
Swap:            0          0          0
我们将类命名为 Ram。相应的文件将为 widget/ram.php。我们在这里只是编写基础并实现 get_title 。
<?php
namespace AX\StatBoard\Widget;

class Ram implements Provider {
  function __construct() {
  }

  public function get_title() {
    return "Ram Usage";
  }

?>
<?php
function get_metric() {
    $df = `free -m | grep -E "(Mem|Swap)" | awk '{print $1, $2, $3, $4}'`;
    $df = explode("\n", $df);
    if ( is_array( $df ) && 2 <= count( $df ) ) {
      $df = array_map( function ( $line ) {
        if ( empty( $line ) ) {
          return;
        }
        $segment = preg_split( '/\s+/', $line );

        return array(
          'type' => trim( $segment[0]," :" ),
          'total' => (int)$segment[1],
          'used' =>  (int)$segment[2],
          'free' =>  (int)$segment[3],
        );
      }, $df );
      return $df;
    }
    return false;
  }
?>
[vagrant@vagrant-centos64 ~]$ free -m | grep -E "Mem|Swap" | awk '{print $1, $2, $3, $4}'
Mem: 589 541 47
Swap: 255 0 255
[vagrant@vagrant-centos64 ~]$
- type:第一个字段
- total:第二个字段
- used:第三个字段
- free:第四个字段
 public function get_content() {
    $metric = $this->get_metric();
    $data = array(
      array('Type', 'Used(MB)', 'Free(MB)')
    );

    foreach ($metric as $item) {
      if (empty($item)) {
        continue;
      }
      if ($item['type'] !== 'Mem' && $item['type'] !== 'Swap') {
        continue;
      }
      if ( 0 == ($item['free'] + $item['used'])) {
        continue;
      }

      $data[] = array(
        $item['type'],$item['used'], $item['free']
        );
    }
    $data   =  json_encode($data);
    echo <<<EOD
      <div id="widget_ram_usage"></div>
      <script type="text/javascript">
      google.setOnLoadCallback(function () {
        var data = google.visualization.arrayToDataTable({$data});
        var options = {
          isStacked: true
        };
        var chart = new google.visualization.ColumnChart(document.getElementById('widget_ram_usage'));
        chart.draw(data, options);
      })
    </script>
EOD;
  }

安装的软件
我们将介绍的第二个小部件是显示已安装软件的小部件。它是一个小部件,旨在显示我们在服务器上有哪些常见软件包以及哪个版本。
<?php
namespace AX\StatBoard\Widget;

class Software implements Provider {
  function __construct() {
  }

  public function get_title() {
    return "Installed Software";
  }
  function get_metric() {
    $cmds = array();

    $package = array(
      'php'   => '-v',
      'node'  => '-v',
      'mysql' => '-V',
      'vim'   => '--version',
      'python' => '-V',
      'ruby'  => '-v',
      'java'  => '-version',
      'curl'  => '-V');

    foreach ( $package as $cmd=>$version_query ) {
      if ( NULL == $cmds[$cmd] = shell_exec( "which $cmd" ) ) {
        $cmds[ $cmd ] = 'Not installed';
        continue;
      }
      $version = shell_exec( "$cmd $version_query" );
      $version = explode( "\n", $version );
      if ( is_array( $version ) ) {
        $version = array_shift( $version );
      }
      $cmds[ $cmd ] .= '<br>' . $version;
    }
    return $cmds;
  }
  public function get_content() {

    $cmds = $this->get_metric();
    $content = '';

    foreach ( $cmds as $cmd => $info ) {
      $content .= "<p><strong>$cmd</strong>  $info</p>";
    }
    echo $content;

  }

磁盘使用情况
现在我们将解决磁盘使用问题。我们将处理此任务的类命名为 Disk。让我们先制作基本骨架。
<?php
namespace AX\StatBoard\Widget;

class Disk implements Provider {
  function __construct() {
  }
  public function get_title() {
    return "Disk Usage";
  }
}
<?php
  function get_metric() {
    $df = `df -h`;
    $df = explode("\n", $df);
    if (is_array($df) && count($df)>=2) {
      array_shift($df); //Get rid the first line
      $df = array_map(function ($line) {
        if (empty($line)) {
          return NULL;
        }
        $segment=preg_split('/\s+/', $line);

        return array(
          'filesystem' => $segment[0],
          'size' => $segment[1],
          'used' => $segment[2],
          'available' => $segment[3],
          'use_percent' => $segment[4],
        );
      }, $df);
      return $df;
    }
    return false;
  }
[vagrant@vagrant-centos64 ~]$ df -h
Filesystem            Size  Used Avail Use% Mounted on
/dev/sda1             7.3G  1.4G  5.6G  20% /
tmpfs                 295M     0  295M   0% /dev/shm
/vagrant               60G   55G  4.9G  92% /vagrant
/data/GeoIP            60G   55G  4.9G  92% /data/GeoIP
/var/webapps           60G   55G  4.9G  92% /var/webapps
/var/www/html          60G   55G  4.9G  92% /var/www/html
  public function get_content() {
    $metric = $this->get_metric();
    $data = array(
      array( 'Disk', 'Space' )
    );

    $disk_container = array();
    $data_partition = array(
      array('Filesystem', 'Free(GB)', 'Used(GB)')
    );
    foreach ( $metric as $disk ) {
      $size = intval( $disk['size'] );
      if ( 'M' == substr( $disk['size'], -1 ) ) {
        $size = round( $size / 1024, 2 );
      }
      $used = intval( $disk['used'] );
      if ('M' == substr( $disk['used'], -1 ) ) {
        $used = round( $used / 1024, 2 );
      }

      if ( empty( $size ) ) {
        continue;
      }
      $data[] = array( $disk['filesystem'], $size );
      $data_partition[] = array($disk['filesystem'], $size - $used, $used);
    }
  }
[  ['File System', 'Free', 'Used',
  ['/dev/sda1', 10, 24],
  ['/dev/sda2', 28, 19]]
- 第一个图表显示了每个已安装文件系统的总空间。对于此数据,我们将使用饼图。
- 第二个图表用于显示每个已安装文件系统的磁盘使用情况。为此,我们将使用条形图。
为此,我们将方法修改为以下内容:
  public function get_content() {
    $metric = $this->get_metric();
    $data = array(
      array('Disk', 'Space')
    );

    $disk_container = array();
    $data_partition = array(
      array('Filesystem', 'Free(GB)', 'Used(GB)')
    );
    foreach ($metric as $disk) {
      $size = intval($disk['size']);
      if ('M' == substr($disk['size'], -1)) {
        $size = round($size / 1024, 2);
      }
      $used = intval($disk['used']);
      if ('M' == substr($disk['used'], -1)) {
        $used = round($used / 1024, 2);
      }

      if (empty($size)) {
        continue;
      }
      $data[] = array($disk['filesystem'], $size);
      $data_partition[] = array($disk['filesystem'], $size - $used, $used);
    }
    $data = json_encode($data);
    $data_partition = json_encode($data_partition);

    echo <<<EOD
      <div id="widget_disk_usage"></div>
      <div id="widget_disk_partion"></div>
      <script type="text/javascript">
      google.load("visualization", "1", {packages:["corechart"]});
      google.setOnLoadCallback(function () {
        var data = google.visualization.arrayToDataTable({$data});
        var options = {
          is3D: true,
        };
        var chart = new google.visualization.PieChart(document.getElementById('widget_disk_usage'));
        chart.draw(data, options);

        var data2 = google.visualization.arrayToDataTable({$data_partition});
        var options2 = {
          isStacked: true
        };
        var chart2 = new google.visualization.ColumnChart(document.getElementById('widget_disk_partion'));
        chart2.draw(data2, options2);

      })
    </script>
EOD;
  }
      <div id="widget_disk_usage"></div>
      <div id="widget_disk_partion"></div>

服务器信息
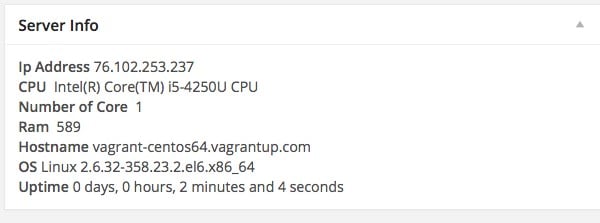
这个小部件向我们显示信息:Linux 内核、CPU 架构、正常运行时间、IP 地址。我们这里不需要图表,一个简单的数据表就可以完成这项工作。调用该类是Server。这是 widget/server.php
的第一个内容<?php
namespace AX\StatBoard\Widget;
use DateTime;
class Server implements Provider {
function __construct() {
}
public function get_title() {
return "Server Info";
}
/**
* Return server info: OS, Kernel, Uptime, and hostname
* @return array with 3 metric:
* * hostname
* * os
* * uptime
*/
function get_metric() {
$server = array();
$server['hostname'] = `hostname`;
$server['os'] = `uname -sr`;
$server['core'] = `grep -c ^processor /proc/cpuinfo`;
$total_uptime_sec = time() - `cut -d. -f1 /proc/uptime`;
$now = new DateTime("now");
$server['uptime'] = $now->diff(new DateTime("@$total_uptime_sec"))->format('%a days, %h hours, %i minutes and %s seconds');
// Get the external ip with ifconfig.me, a website that show you ip address in plaintext
// when sending request with curl header
$server['ip'] = `curl ifconfig.me`;
$server['ram'] = `free -m | grep Mem | awk '{print $2}'`;
$server['cpu'] =`cat /proc/cpuinfo | grep "model name" | awk '{print $4,$5,$6,$7}'`;
return $server;
}
}
主机名
显示您的服务器主机名。
名称-sr
显示Linux内核信息:
[vagrant@vagrant-centos64 ~]$ uname -sr
Linux 2.6.32-358.23.2.el6.x86_64
grep -c ^处理器/proc/cpuinfo
-c 开关打印输入字符串中匹配行的计数。 /proc/cpuinfo 包含处理器信息。我们 grep 它并计算文字处理器的出现次数。这是我的 32 核结果。
$ grep -c ^processor /proc/cpuinfo
32
剪切-d。 -f1 /proc/uptime
此命令显示服务器已启动并运行的秒数。我们将秒数转换为“x 天 y 小时 z 分钟”的格式,以使其更加用户友好。
使用 DateTime::diff 我们可以轻松实现这一点。我们创建一个带有当前时间戳的 DateTime 对象,另一个带有时间戳的对象是当前时间戳减去正常运行时间的秒数。然后使用 format 方法将其格式化为人类友好的字符串。
这是我的结果,正常运行时间为 26194091 秒。
$ cut -d. -f1 /proc/uptime
26194091
卷曲 ifconfig.me
ifconfig.me 是一项在浏览器内直接访问时显示您的 IP 地址的服务。如果您使用 curl 向其发送请求,它将以单个字符串形式返回您的 IP 地址。
[vagrant@vagrant-centos64 ~]$ curl ifconfig.me
76.102.253.237
CPU型号
如上所述,/proc/cpuinfo存储了CPU信息。我们可以从中提取CPU型号。例如:[vagrant@vagrant-centos64 ~]$ cat /proc/cpuinfo | grep "model name" | awk '{print $4,$5,$6,$7}'
Intel(R) Core(TM) i5-4250U CPU
  public function get_content() {
    $server = $this->get_metric();
    echo <<<EOD
    <strong>Ip Address</strong> {$server['ip']}<br>
    <strong>CPU</strong>  {$server['cpu']}<br>
    <strong>Number of Core</strong>  {$server['core']}<br>
    <strong>Ram</strong>  {$server['ram']}<br>
    <strong>Hostname</strong> {$server['hostname']}<br>
    <strong>OS</strong> {$server['os']}<br>
    <strong>Uptime</strong> {$server['uptime']}<br>
EOD;
  }
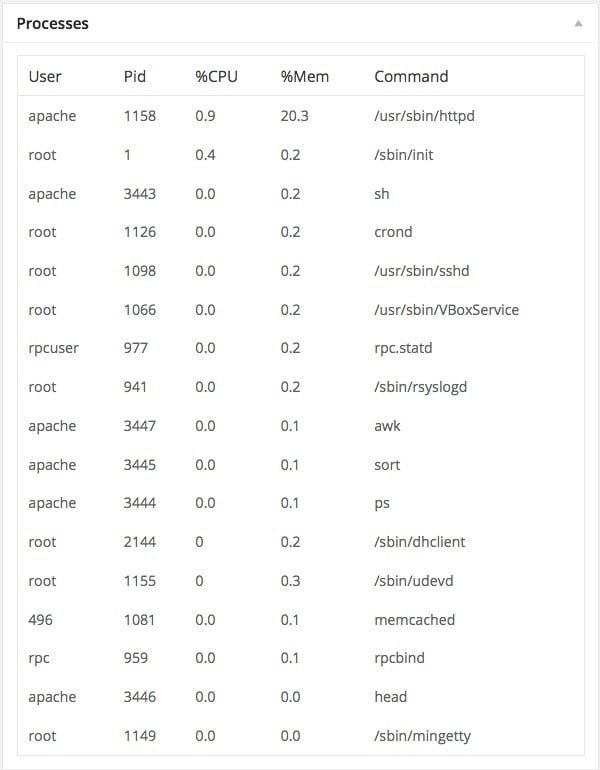
处理器
监控我们的处理器是其中之一我们可以展示的最重要的东西。我们想知道某个特定进程正在使用多少 CPU 和/或消耗了多少内存。我们将我们的类称为 Process,首先从 get_title 和 get_metric 开始。我将在代码后面解释 get_metric 的更多细节:<?php
namespace AX\StatBoard\Widget;
class Process implements Provider {
public function get_title() {
return "Processes";
}
/**
* Return server info: OS, Kernel, Uptime, and hostname
* @return array with 3 metric:
* * hostname
* * os
* * uptime
*/
function get_metric() {
$processes = array();
$output = `ps -eo pcpu,pmem,pid,user,args,time,start | grep -v '\[' | sort -k 1 -r | head -30 | awk '{print $4,$3,$1,$2,$7,$6,$5}'`;
$output = explode("\n", $output);
if (!is_array($output) || count($output)<2) {
return false;
}
array_shift($output);
foreach ($output as $line) {
//$line = preg_split('/\s+/', $line);
$line = explode(' ', $line);
if (count($line)<6) {
continue;
}
//var_dump($line);
//echo count($line);
if (empty($processes[$line[6]])) {
$processes[$line[6]] = array_combine(array('user', 'pid', '%cpu', '%mem','start','time', 'command'), $line);
} else {
$processes[$line[6]]['%cpu'] += $line[2];
$processes[$line[6]]['%mem'] += $line[3];
}
}
return $processes;
}
}
[vagrant@vagrant-centos64 ~]$ ps -eo pcpu,pmem,pid,user,args,time,start
%CPU %MEM   PID USER     COMMAND                         TIME  STARTED
 0.0  0.2     1 root     /sbin/init                  00:00:00 06:50:39
 0.0  0.0     2 root     [kthreadd]                  00:00:00 06:50:39
 0.0  0.0     3 root     [migration/0]               00:00:00 06:50:39
[vagrant@vagrant-centos64 ~]$ ps -eo pcpu,pmem,pid,user,args,time,start | grep -v '\['
%CPU %MEM   PID USER     COMMAND                         TIME  STARTED
 0.0  0.2     1 root     /sbin/init                  00:00:00 06:50:39
 0.0  0.1   292 root     /sbin/udevd -d              00:00:00 06:50:41
 0.0  0.1   811 root     /sbin/dhclient -H vagrant-c 00:00:00 06:50:48
 0.0  0.2   948 root     /sbin/rsyslogd -i /var/run/ 00:00:00 06:50:50
 0.0  0.1   966 rpc      rpcbind                     00:00:00 06:50:50
 0.0  0.2   984 rpcuser  rpc.statd                   00:00:00 06:50:50
 0.0  0.0  1011 root     rpc.idmapd                  00:00:00 06:50:51
 0.0  0.2  1073 root     /usr/sbin/VBoxService       00:00:00 06:50:51
[vagrant@vagrant-centos64 ~]$ ps -eo pcpu,pmem,pid,user,args,time,start | grep -v '\[' | sort -k 1 |  head -30 | awk '{print $4,$3,$1,$2,$7,$6,$5}'
root 1151 0.0 0.0 00:00:00 -d /sbin/udevd
root 1152 0.0 0.0 00:00:00 -d /sbin/udevd
root 292 0.0 0.0 00:00:00 -d /sbin/udevd
root 811 0.0 0.0 vagrant-c -H /sbin/dhclient
root 1 0.0 0.1 06:50:39 00:00:00 /sbin/init
root 2153 0.0 0.1 -q -1 /sbin/dhclient
root 3642 0.0 0.1 00:00:00 -s /usr/sbin/anacron
vagrant 3808 0.0 0.1 pcpu,pmem,pid,user,a -eo ps
vagrant 3810 0.0 0.1 1 -k sort
vagrant 3811 0.0 0.1 00:00:00 -30 head
vagrant 3812 0.0 0.1 $4,$3,$1,$2,$7,$ {print awk
root 948 0.0 0.1 /var/run/ -i /sbin/rsyslogd
rpc 966 0.0 0.1 06:50:50 00:00:00 rpcbind
root 1073 0.0 0.2 06:50:51 00:00:00 /usr/sbin/VBoxService
root 1105 0.0 0.2 06:50:51 00:00:00 /usr/sbin/sshd
root 1121 0.0 0.2 06:50:52 00:00:00 crond
rpcuser 984 0.0 0.2 06:50:50 00:00:00 rpc.statd
496 1088 0.0 0.3 -p -d memcached
vagrant 3544 0.0 0.3 00:00:00 vagrant@pts/0 sshd:
vagrant 3545 0.0 0.3 06:59:27 00:00:00 -bash
root 1113 0.0 1.7 06:50:52 00:00:00 /usr/sbin/httpd
apache 1157 0.0 4.2 06:50:53 00:00:01 /usr/sbin/httpd
apache 3438 0.0 4.2 06:55:39 00:00:01 /usr/sbin/httpd
<?php
//...
// inside get_content

    foreach ( $output as $line ) {
      //$line = preg_split( '/\s+/', $line );
      $line = explode( ' ', $line );
      if ( 6 > count( $line ) ) {
        continue;
      }
      if ( empty( $processes[ $line[6] ] ) ) {
        $processes[ $line[6]] = array_combine( array( 'user', 'pid', '%cpu', '%mem','start','time', 'command' ), $line );
      } else {
        $processes[ $line[6] ]['%cpu'] += $line[2];
        $processes[ $line[6] ]['%mem'] += $line[3];
      }
    }
//...
  public function get_content() {
    $processes = $this->get_metric();
    $html = '<table class="wp-list-table widefat"><thead><tr>
      <th>User</th>
      <th>Pid</th>
      <th>%CPU</th>
      <th>%Mem</th>
      <th>Command</th>
      </tr></thead><tbody>';
    foreach ($processes as $process) {
      $html .= "<tr>
        <td>{$process['user']}</td>
        <td>{$process['pid']}</td>
        <td>{$process['%cpu']}</td>
        <td>{$process['%mem']}</td>
        <td>{$process['command']}</td>
        </tr>";
    }
    $html .= '</tbody></table>';
    echo $html;
  }
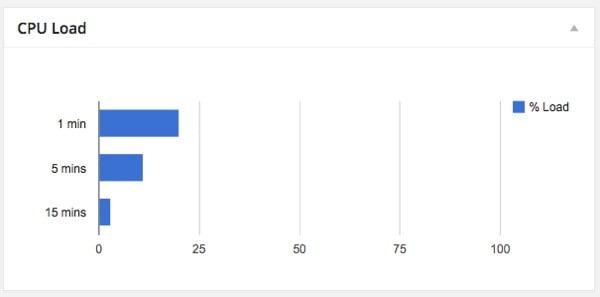
平均负载
Linux 有一个命令可以显示过去一分钟、五分钟和 15 分钟内 CPU 和 IO 的平均负载。让我们把它压缩成一个小部件。称之为 Cpuload,并创建我们的 widget/cpuload.php
<?php
namespace AX\StatBoard\Widget;

class Cpuload implements Provider {
  function __construct() {
  }

  public function get_title() {
    return "CPU Load";
  }
  function get_metric() {    $number_of_core = intval(`/bin/grep -c processor /proc/cpuinfo`);    $loadAvg = `cat /proc/loadavg | /usr/bin/awk '{print $1,$2,$3}'`;    $loadAvg = explode(' ', $loadAvg);    if ($loadAvg <3) {      return false;    }    $loadTimes = array('1 min', '5 mins', '15 mins');    return array_map(      function ($loadtime, $value, $number_of_core) {        return array($loadtime, round($value * 100 / $number_of_core, 2), $value);      },        $loadTimes,        $loadAvg,        array_fill(0, 3, $number_of_core)      );  }

}
部分对此进行了介绍。
  ~  cat /proc/loadavg
0.01 0.04 0.05 1/217 16089
  ~  cat /proc/loadavg | awk '{print $1, $2, $3}'
0.01 0.04 0.05
  public function get_content() {
    $metrics = $this->get_metric();
    if ( ! $metrics ) {
      return false;
    }
    // see https://google-developers.appspot.com/chart/interactive/docs/gallery/barchart#Data_Format for more detai of format
    $data = array( array( 'Duration', '% Load' ) );
    foreach ( $metrics as $key=>$metric ) {
      array_push( $data, array( $metric[0], $metric[1] ) );
    }
    $data = json_encode( $data );
    echo <<<EOD
<div id="avg_load"></div>
<script type="text/javascript">
      google.load("visualization", "1", {packages:["corechart"]});
      google.setOnLoadCallback(drawChart);
      function drawChart() {
        var data = google.visualization.arrayToDataTable($data);

        var options = {
          hAxis: {
            titleTextStyle: {color: 'red'},
            minValue:0,
            maxValue:100
          }
        };

        var chart = new google.visualization.BarChart(document.getElementById('avg_load'));
        chart.draw(data, options);
      }
    </script>
EOD;
  }
[ ["Duration","% Load"], ["1 min",20], ["5 mins",11], ["15 mins",3]]
以太网接口
我们要处理的下一个小部件是以太网接口。某些服务器可以有多个以太网接口,并为其分配不同的 IP 地址。
看到这些信息非常有用。我们将这个类称为 Ethernet,从 widget/ethernet.php 的基本内容开始。
<?php
/**
 * Adopt from https://github.com/afaqurk/linux-dash/blob/master/sh/ip.php
 *
 */
namespace AX\StatBoard\Widget;

class Ethernet implements Provider {
  function __construct() {
  }

  public function get_title() {
    return "Ethernet";
  }

  function get_metric() {
    $ethernet = array();
    $output = shell_exec("ip -oneline link show | awk '{print $2}' | sed 's/://'");
    if (!$output) { // It didn't work with "ip" , so we do it with ifconfig
      $output = shell_exec(
        'ifconfig | /bin/grep -B1 "inet addr" | /usr/bin/awk \'' .
        '{ if ( $1 == "inet" ) { print $2 }' .
        'else if ( $2 == "Link" ) { printf "%s:",$1 } }\' | /usr/bin/awk' .
        ' -F: \'{ print $1","$3 }\''
      );
      $output = trim($output, " \n");
      $output = `ifconfig | grep "Link encap" | awk '{ print $1 }'`;
      $interfaces = explode("\n", $output);
      $output = `ifconfiga | grep "inet addr" | awk '{ print $2 }' | sed 's/addr://'`;
      $addreses = explode("\n", $output);
      $output = trim($output, " \n");
      return array_combine($interfaces, $addreses);
    }

    $output = trim($output, " \n");
    $interfaces = explode("\n", $output);
    $addreses = array();
    foreach ($interfaces as $interface) {
      $output = shell_exec("ip -oneline -family inet addr show $interface | awk '{print $4}' | cut -d'/' -f1");
      $addreses[] = $output;
    }
    return array_combine($interfaces, $addreses);
  }

}
$output = shell_exec("ip -oneline link show | awk '{print $2}' | sed 's/://'");
使用 IP 实用程序
带有 ip 命令和 -oneline 将仅在一行中显示输出,其中 link 和 show 将列出所有设备。我们使用 awk 获取第二列,其中包含设备名称;但是它包含 : 字符。我们使用 sed 将 : 替换为空字符串。
[vagrant@vagrant-centos64 sbin]$ ip -oneline link show
1: lo: <LOOPBACK,UP,LOWER_UP> mtu 16436 qdisc noqueue state UNKNOWN \    link/loopback 00:00:00:00:00:00 brd 00:00:00:00:00:00
2: eth0: <BROADCAST,MULTICAST,UP,LOWER_UP> mtu 1500 qdisc pfifo_fast state UP qlen 1000\    link/ether 08:00:27:08:c2:e4 brd ff:ff:ff:ff:ff:ff
3: eth1: <BROADCAST,MULTICAST,UP,LOWER_UP> mtu 1500 qdisc pfifo_fast state UP qlen 1000\    link/ether 08:00:27:eb:11:e4 brd ff:ff:ff:ff:ff:ff
[vagrant@vagrant-centos64 sbin]$ ip -oneline link show | awk '{print $2}'
lo:
eth0:
eth1:
[vagrant@vagrant-centos64 sbin]$ ip -oneline link show | awk '{print $2}' | sed 's/://'
lo
eth0
eth1
[vagrant@vagrant-centos64 sbin]$
$output = trim($output, " \n");
$interfaces = explode("\n", $output);
    $addreses = array();
    foreach ($interfaces as $interface) {
      $output = shell_exec("ip -oneline -family inet addr show $interface | awk '{print $4}' | cut -d'/' -f1");
      $addreses[] = $output;
    }
[vagrant@vagrant-centos64 sbin]$ ip -oneline -family inet addr show eth1
3: eth1    inet 192.168.1.111/24 brd 192.168.1.255 scope global eth1
[vagrant@vagrant-centos64 sbin]$ ip -oneline -family inet addr show eth1 | awk '{print $4}'
192.168.1.111/24
[vagrant@vagrant-centos64 sbin]$ ip -oneline -family inet addr show eth1 | awk '{print $4}' | cut -d'/' -f1
192.168.1.111
[vagrant@vagrant-centos64 sbin]$
return array_combine($interfaces, $addreses);
使用 ifconfig 的服务器
在 ifconfig 的情况下,ip 的 shell_exec 将返回 false。在这种情况下,我们改为运行 ifconfig。 if (!$output) { // It didn't work with "ip" , so we do it with ifconfig
$output = `ifconfig | grep "Link encap" | awk '{ print $1 }'`;
$interfaces = explode("\n", $output);
$output = `ifconfig | grep "inet addr" | awk '{ print $2 }' | sed 's/addr://'`;
$addreses = explode("\n", $output);
$output = trim($output, " \n");
return array_combine($interfaces, $addreses);
}
[vagrant@vagrant-centos64 sbin]$ ifconfig
eth0      Link encap:Ethernet  HWaddr 08:00:27:08:C2:E4
          inet addr:10.0.2.15  Bcast:10.0.2.255  Mask:255.255.255.0
          inet6 addr: fe80::a00:27ff:fe08:c2e4/64 Scope:Link
          UP BROADCAST RUNNING MULTICAST  MTU:1500  Metric:1
          RX packets:4230 errors:0 dropped:0 overruns:0 frame:0
          TX packets:2575 errors:0 dropped:0 overruns:0 carrier:0
          collisions:0 txqueuelen:1000
          RX bytes:444488 (434.0 KiB)  TX bytes:2288676 (2.1 MiB)

eth1      Link encap:Ethernet  HWaddr 08:00:27:EB:11:E4
          inet addr:192.168.1.111  Bcast:192.168.1.255  Mask:255.255.255.0
          inet6 addr: fe80::a00:27ff:feeb:11e4/64 Scope:Link
          UP BROADCAST RUNNING MULTICAST  MTU:1500  Metric:1
          RX packets:4470 errors:0 dropped:0 overruns:0 frame:0
          TX packets:2449 errors:0 dropped:0 overruns:0 carrier:0
          collisions:0 txqueuelen:1000
          RX bytes:1689803 (1.6 MiB)  TX bytes:271675 (265.3 KiB)

lo        Link encap:Local Loopback
          inet addr:127.0.0.1  Mask:255.0.0.0
          inet6 addr: ::1/128 Scope:Host
          UP LOOPBACK RUNNING  MTU:16436  Metric:1
          RX packets:264 errors:0 dropped:0 overruns:0 frame:0
          TX packets:264 errors:0 dropped:0 overruns:0 carrier:0
          collisions:0 txqueuelen:0
          RX bytes:15840 (15.4 KiB)  TX bytes:15840 (15.4 KiB)

[vagrant@vagrant-centos64 sbin]$ ifconfig | grep "Link encap"
eth0      Link encap:Ethernet  HWaddr 08:00:27:08:C2:E4
eth1      Link encap:Ethernet  HWaddr 08:00:27:EB:11:E4
lo        Link encap:Local Loopback
[vagrant@vagrant-centos64 sbin]$ ifconfig | grep "Link encap" | awk '{ print $1 }'
eth0
eth1
lo

[vagrant@vagrant-centos64 sbin]$ ifconfig | grep "inet addr"
          inet addr:10.0.2.15  Bcast:10.0.2.255  Mask:255.255.255.0
          inet addr:192.168.1.111  Bcast:192.168.1.255  Mask:255.255.255.0
          inet addr:127.0.0.1  Mask:255.0.0.0
[vagrant@vagrant-centos64 sbin]$ ifconfig | grep "inet addr" | awk '{ print $2 }'
addr:10.0.2.15
addr:192.168.1.111
addr:127.0.0.1
[vagrant@vagrant-centos64 sbin]$ ifconfig | grep "inet addr" | awk '{ print $2 }' | sed 's/addr://'
10.0.2.15
192.168.1.111
127.0.0.1
[vagrant@vagrant-centos64 sbin]$
  public function get_content() {
    $interfaces = $this->get_metric();
    $html = '<table class="wp-list-table widefat"><thead><tr>
      <th>Interface</th>
      <th>IP</th>
      </tr></thead><tbody>';
    foreach ( $interfaces as $interface => $ip ) {
      $html .= "<tr>
        <td>{$interface}</td>
        <td>{$ip}</td>
        </tr>";
    }
    $html .= '</tbody></table>';
    echo $html;
  }
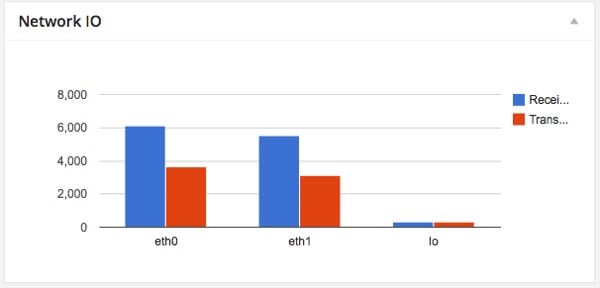
网络流量
网络流量或网络 IO 显示通过计算机网络传输包的状态。该信息是从 netstat 中提取的。
[vagrant@vagrant-centos64 sbin]$ netstat -i
Kernel Interface table
Iface       MTU Met    RX-OK RX-ERR RX-DRP RX-OVR    TX-OK TX-ERR TX-DRP TX-OVR Flg
eth0       1500   0     4828      0      0      0     2933      0      0      0 BMRU
eth1       1500   0     4806      0      0      0     2679      0      0      0 BMRU
lo        16436   0      276      0      0      0      276      0      0      0 LRU
<?php
/**
 * Adopt from https://github.com/afaqurk/linux-dash/blob/master/sh/ip.php
 *
 */
namespace AX\StatBoard\Widget;

class Networkio implements Provider {
  function __construct() {
  }

  public function get_title() {
    return "Network IO";
  }
  function get_metric() {    $ethernet = array();       $output = `netstat -i | grep -v -E '(Iface|Interface)' | awk '{print $1","$4","$8}'`;    $lines = explode("\n", $output);    foreach ($lines as $line) {      $line = explode(',', $line);      if (count($line)<3) {        continue;      }      $ethernet[] = array($line[0], intval($line[1]), intval($line[2]));    }    return $ethernet;  }}
[vagrant@vagrant-centos64 sbin]$ netstat -i
Kernel Interface table
Iface       MTU Met    RX-OK RX-ERR RX-DRP RX-OVR    TX-OK TX-ERR TX-DRP TX-OVR Flg
eth0       1500   0     5727      0      0      0     3400      0      0      0 BMRU
eth1       1500   0     5004      0      0      0     2797      0      0      0 BMRU
lo        16436   0      292      0      0      0      292      0      0      0 LRU

[vagrant@vagrant-centos64 sbin]$ netstat -i | grep -v -E '(Iface|Interface)'
eth0       1500   0     5736      0      0      0     3405      0      0      0 BMRU
eth1       1500   0     5004      0      0      0     2797      0      0      0 BMRU
lo        16436   0      292      0      0      0      292      0      0      0 LRU

[vagrant@vagrant-centos64 sbin]$ netstat -i | grep -v -E '(Iface|Interface)' | awk '{print $1","$4","$8}'
eth0,5760,3420
eth1,5004,2797
lo,292,292
[vagrant@vagrant-centos64 sbin]$
在我们的get_metric中,我们将结果逐行拆分到一个数组中。因为每一行都包含用逗号分隔的数据,所以它们被再次分割成一个数组。
  public function get_content() {
    $interfaces = $this->get_metric();
    $data = array_merge(array(array('Interface', 'Receive(package)', 'Transfer(package)')), $interfaces);
    $data = json_encode($data);
    echo <<<EOD
      <div id="nio_chart"></div>
      <script type="text/javascript">
      google.setOnLoadCallback(function () {
        var data = google.visualization.arrayToDataTable({$data});

        var options = {
        };

        var chart = new google.visualization.ColumnChart(document.getElementById('nio_chart'));
        chart.draw(data, options);
      })
    </script>
EOD;

  }
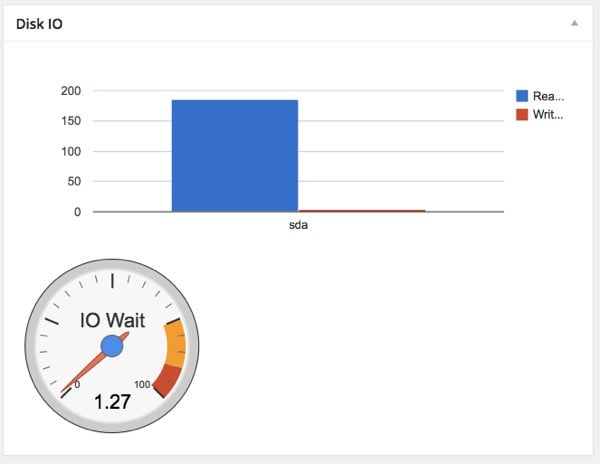
输入/输出统计
现在,我们处理 io stat。 IO 表示输入/输出。我们将了解每秒执行多少次读/写操作。我们还处理 io_wait。 IO等待是CPU空闲等待从硬盘读取结果的时间。
比如你正在读取MySQL数据,CPU会空闲下来等待结果。 io wait 按1秒或1000毫秒计算。如果您的代码需要 100 毫秒从硬盘读取数据,则 io_wait 为 100/1000 = 10%。 IO 等待越少,系统性能越好。
为了继续执行此操作,请确保系统上有 sysstat 软件包。
- 对于 Arch Linux,使用 pacman -S sysstat 安装
- 对于 Debian/Ubuntu,您可以使用 apt-get install sysstat 获取它们
- 对于 Fedora/Centos,您可以使用 yum install sysstat
- 对于其他发行版,:请使用您的发行版包管理器进行安装
安装完成后,让我们评估一下我们将使用的一些命令。首先是第一件事:
[vagrant@vagrant-centos64 sbin]$ iostat
Linux 2.6.32-358.23.2.el6.x86_64 (vagrant-centos64.vagrantup.com)     04/27/2014 	_x86_64_	(1 CPU)

avg-cpu:  %user   %nice %system %iowait  %steal   %idle
           0.05    0.00    0.25    0.04    0.00   99.66

Device:            tps   Blk_read/s   Blk_wrtn/s   Blk_read   Blk_wrtn
sda               0.18         7.62         1.04     157826      21584
[vagrant@vagrant-centos64 ~]$ cat /sys/block/sda/queue/physical_block_size
512
[vagrant@vagrant-centos64 ~]$
有了上面的基本知识,让我们在 widget/iostat.php 中创建我们的类 Iostat 。
<?php

namespace AX\StatBoard\Widget;

class Iostat implements Provider {
  function __construct() {
  }

  public function get_title() {
    return "Disk IO";
  }


  /**
   * Make sure we install package sysstat
   * yum install sysstat
   * or apt-get install sysstat
   *
   * Return IO Stat information. CPU waiting time, disk read/write
   *
   */
  function get_metric() {
    $metric = array();

    $output = `iostat`;
    $number_of_core = intval(`/bin/grep -c processor /proc/cpuinfo`);

    $lines = explode("\n", $output);
    //We should have more than  4 lines
    if (!is_array($lines) || sizeof($lines)<4) {
      return false;
    }
    $avg_cpu = preg_split("/\s+/", $lines[3]);
    $metric['cpu'] = array(
      'user'    => floatval($avg_cpu[0]) * $number_of_core,
      'system'  => floatval($avg_cpu[2]) * $number_of_core,
      'io_wait' => floatval($avg_cpu[3]) * $number_of_core,
      'other'   => 100 - ($avg_cpu[0] + $avg_cpu[2] + $avg_cpu[3])
    );

    if (sizeof($lines) >=7) {
      for ($i=6,$l = sizeof($lines);$i<$l; $i++) {
        $line = preg_split("/\s+/", $lines[$i]);
        if (!is_array($line) || sizeof($line)<5) {
          continue;
        }
        // Calculate block size
        $block_size = shell_exec("cat /sys/block/{$lines[1]}/queue/physical_block_size");

        $metric['disk'][$line[0]] = array(
          'read'  => floatval($line[2]) * $block_size / 1024,
          'write' => floatval($line[3]) * $block_size / 1024,
        );

      }
    }

    return $metric;
  }

}
  public function get_content() {
    $metric = $this->get_metric();
    $disk_io = array(
      array('Disk', 'Read(MB)', 'Write(MB)'),
    );
    foreach ($metric['disk'] as $disk=>$stat) {
      $disk_io[] = array($disk, $stat['read'], $stat['write']);
    }
    $disk_io = json_encode($disk_io);

    $cpu_io = json_encode(array(
      array('CPU Time', 'Percent'),
      array('IO Wait', $metric['cpu']['io_wait']),
    ));

    echo <<<EOD
      <div id="widget_disk_io"></div>
      <div id="widget_cpu_io_wait"></div>
      <script type="text/javascript">
      google.load('visualization', '1', {packages:['gauge']});
      google.setOnLoadCallback(function () {
        var data = google.visualization.arrayToDataTable({$cpu_io});
        var goptions = {
          redFrom: 80, redTo: 100,
          yellowFrom:50, yellowTo: 80,
          minorTicks: 5
        };
        var chart = new google.visualization.Gauge(document.getElementById('widget_cpu_io_wait'));
        chart.draw(data, goptions);

        var data2 = google.visualization.arrayToDataTable({$disk_io});
        var chart2 = new google.visualization.ColumnChart(document.getElementById('widget_disk_io'));
        chart2.draw(data2, {});
      })
    </script>
EOD;

  }
将Transforming a WordPress Server Dashboard into a Widget的详细内容,更多请关注红帽云邮其它相关文章!

这里不仅为大家提供了WPS Office安装包,还有office/word/excel/ppt/wps的零基础入门到精通超全教程,你想学的和不懂的,这里都有!感兴趣的小伙伴快来保存学习吧!


-
2024-07-24 18:20:14
-
2024-07-24 18:14:22
-
2024-07-24 18:07:44
-
2024-07-24 18:05:05
-
2024-07-24 18:04:21
-
2024-07-24 18:01:00
-
2024-07-24 17:55:29
-
2024-07-24 17:51:14
-
2024-07-24 17:50:25
-
2024-07-24 17:49:22
 0
0 63
63